In 2014, I was having a look at the Mozilla Firefox OS Sync App (https://marketplace.firefox.com/app/pcsync). This App allows to sync your Firefox OS phone to your Firefox browser on your PC.
While I was trying it out I noticed a major security flaw with the way the App on the phone and the plugin within Firefox Browser communicate together over WI-FI, which exposes all data stored on the phone, i.e. contacts, photos, videos etc.
What is worse, is that in most scenerios the phone user does not close the phone sync application and leaves it running in the background, unaware that there is a giant hole, right in his/her pocket when someone accesses his/her data silently.
The security issue here is due to the simplistic approach of how it was designed.
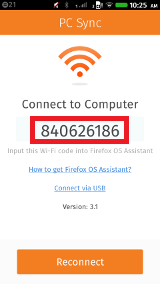
The code you see highlighted in the screenshot is simple the IP converted in to a more user friendly code. This code is then inputted in to the plugin on the Firefox browser, which then communicates to the phone via WIFI, for it to work the phone and PC will have to be on the same network.
We have created a small exploit which will dump the contacts of any phone that is found vulnerable and will not trigger the phone notification that someone is connected to the phone.
The exploit works by pinging all IP address ranges on that network against the hard coded port (Port: 25679) in the App and wait for the app to reply with an acknowledgment packet. Once that acknowledgment packet has be received the attacking application, can then send the required commands to dump any of the information from the phone.
The source code for this exploit tool is available here:
https://github.com/lookuga/FireFoxOSRemoteInformationDumpSyncExploit
Over the last couple of years, we have accumulated a number of ideas, projects and proof of concepts, which never see the public light of day. Over the next few months we will be releasing them to the public either as partially or fully completed.
The first idea/project is a tool we developed to recover the PIN of Firefox OS lock screen. While the logic behind this tool is far from complex, it is a proof of concept to show how the PIN is stored in clear text and is unprotected in Firefox OS.
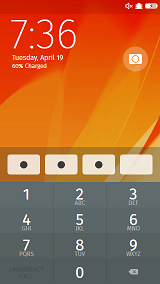
The PIN is stored in a simple SQLite Database and is located in the following:
/data/local/storage/permanent/chrome/idb/
The tool uses the ADB to pull the SQLite Database and read the contents, you could use fastboot and other means to transfer the file off the phone, if ADB is disabled.
The source code for this tool is available here:
https://github.com/lookuga/FireFoxOSPinRecovery
Since December 2015, we have had numerous hacking attempts on Lookuga.com, from SQL Injection to XSS attacks.
While we were kind of happy to see that the blog must be popular enough for people to try and hack it, we were also annoyed by the triggering alerts we were receiving when it was happening.
What a lot people may not be aware of, is that we were running a highly customized version of BlogEngine.NET, with a lot of auditing, reverse tracking and better integration with other platforms, both for security reasons and also to measure the metrics of the content.
While we were implementing these changes we had discovered a number of major security issues, one we even made public (http://lookuga.com/2014/11/16/blogengine-net-security-directory-traversal-attack/), we were not officially credited for it, but we had created the bug report. Along with these security issues, we also had numerous issues with performance when we received large amounts of concurrent hits.
Once we finally had enough with the alerts and issues we decided to move away from BlogEngine.NET to another solution.
We looked at quite a few alternatives, but we decided to choose a static site generator instead of using a dynamic content backend system.
We decided to go with a static site generator because of the following reasons:
The static site generator we decided to use was Jekyll. We chose Jekyll, first because it has a cool name, secondly it is directly supported by GitHub (it was created by the same guy who founded GitHub) and thirdly is has some pretty amazing stuff included which we decided to use:
The entire switch took around a week and a half to do for the following:
Now with Jekyll there was a bit of a learning curve, but once you go through the docs provided both by Jekyll and GitHub it makes it a lot easier, I have committed the source of the blog and required configuration to GitHub, so if anyone is interested in looking through and learning a thing or two from it, please go ahead.
https://github.com/lookuga/lookuga.github.io
Important Reads:
This is the final part of this 3-part blog post, there is a possibility that in the future we may continue with adding further modifications and improvements but they will be published on separate blog posts.
Furthermore, if you haven’t already checked out part 1 and 2, we encourage you to check these out at the following links:
Part 1: http://lookuga.com/post/reverse-engineering-the-krups-piccolo-part-1
Part 2: http://lookuga.com/post/reverse-engineering-the-krups-piccolo-part-2-teardown
So let’s get on with the final post. I would like to start by mentioning that we wanted to challenge ourselves by allocating a budget of just 10 euros to design and build a replacement mainboard. After a couple of minutes we had our part list ready and a couple of minutes later we also found the required parts which we are also sharing with you below:
Part list
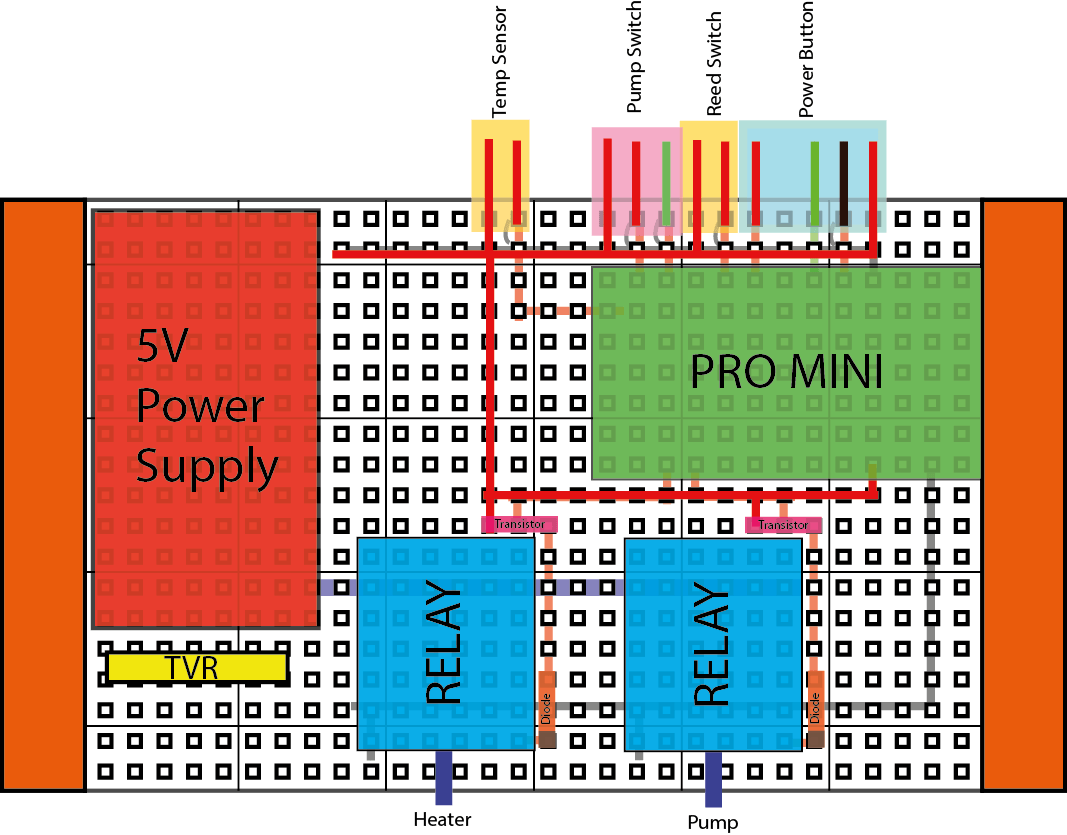
The brains for this mainboard is the ATMEGA168, although we could have used the Atmel Studio to develop on it, we decided to stick with the Arduino Framework, as we thought it might be easier for beginners to use and experiment upon.
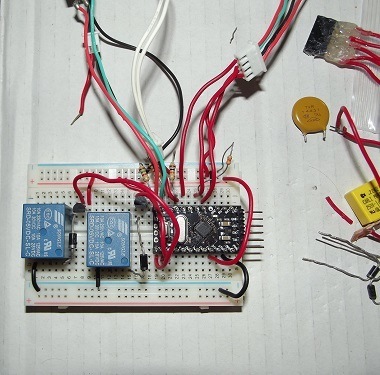
Once we had a working prototype built on a breadboard the next step was to shrink it to fit on a protoboard with the maximum size of 9.4 CM X 5.1 CM with all components and wiring routing.
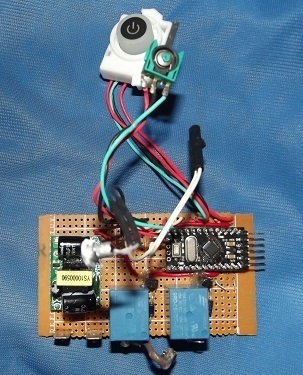
(the TVR is missing from this photo, but should be soldered between the live and natural)
All of the designs and code is licensed under GPL, so you are free to build your own with improvements as long as you release them back to public for free.
As stated earlier, other improvements or modification could be done, which include:
If anyone, does decide to build one for themselves or would like to get a built one, let us know on facebook!
GitHub Link for source code and design:
https://github.com/lookuga/DolceGusto
ProtoBoard.ai
Contains multi-layer illustrator file, broken down (pcb, top wiring,bottom wiring, components etc)<br
KrupsPiccolo_OpenSource.ino
Contains the source code for the microcontroller
Instructions to Use
Welcome to the second part of the Krups Piccolo posts.
This will be a quick, basic and rough tear down of the Krups Piccolo.
1. Remove capsule pressure cap. Insert a paper clip or small screw driver in to the hole to open.

2. Remove the 4 screws behind the water tank.
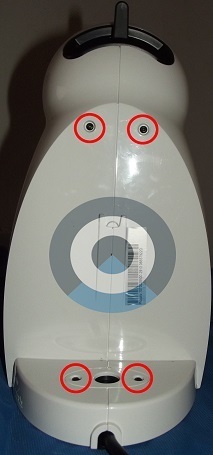
3. Underneath, unhook the 4 clips to open the 2 sides of the machine.

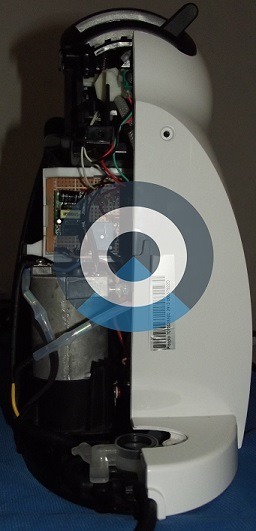
4. Using a flat headed screw driver unclip the remaining clips from each side.
5. Unplug all wiring and unhook the 3 position switch, power button from white case, temp sensor, capsule detector and unclip the mainboard holder.
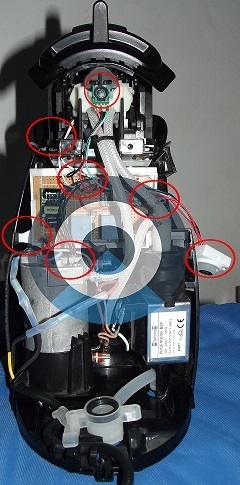
6. Remove water pump by unclipping the 2 clips and slide it out.


8. Unclip the 2 clips underneath the heater and then slide out the heater.


9. Unscrew the 2 screws to remove the head of the machine.

Additional Notes:
The way the pump head works is using a pressure switch to cut off either the cold water pipe or the hot water pipe. This stops one of the pipes, while allowing and forcing the water pressure though the other one.
Check back soon for part 3 where we will release the open source designs for the replacement mainboard.


